Pages

Saturday, 11 January 2014

Here is the 1st Wreath of 2014!

I've seen pictures of these wreaths done...A LOT. I wasn't too sure I could pull it off.

Ya know...those wreaths made of all those extra, unwanted, cool looking Christmas Ball Ornaments.

Well I finally took my chances and gave it a shot. I've totally changed my colour scheme of my Christmas decor over the last few years to those nice bright colours of purple, green, blue, and pink...like the ones in my previous wreaths. Before I was all over the place. Any ornament I received or had bought in the last 20 years was put on the tree! How unorganized I was! I've finally got it together!

Anyways about 7years ago, or longer I can't really remember, when I first started working at Canadian Tire we were able to go into the warehouse and put dibs on broken items that weren't able to go back to the manufacturers and buy them for a few dollars, or whatever the price was that they were marked. The first time I went back there was when we were receive all of the Christmas ornaments and there was a container of about 40 or so red Christmas balls, 2 were broken. So I got a deal on them...but I never used them! They were sitting up in the attic.

Well what a perfect way to try the wreath! I also had a pack of little blue Christmas Balls (yes, I separated that for a reason!)...just enough!

Here's a little D.I.Y.

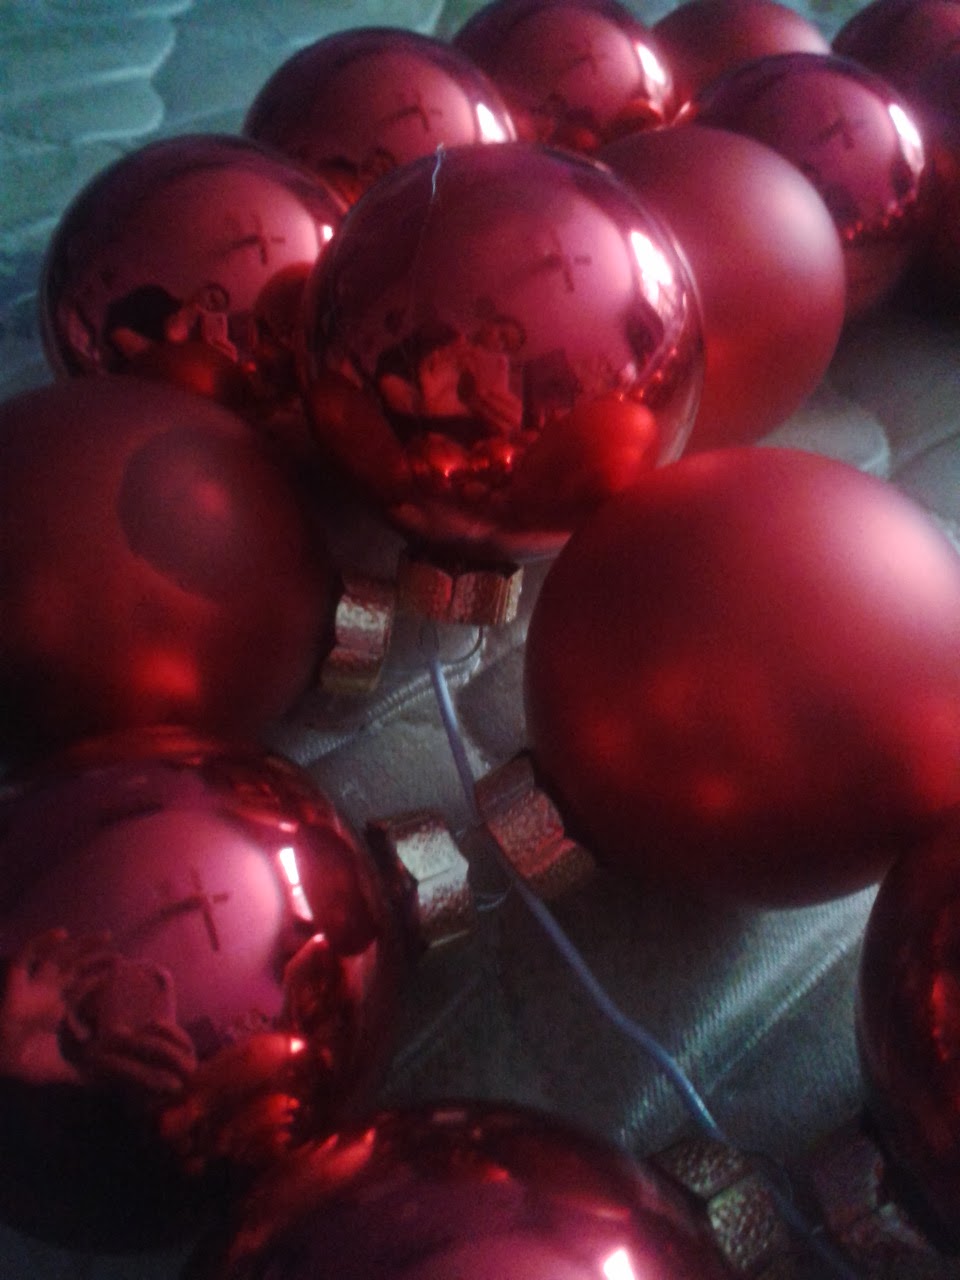
First pull out all the Christmas Balls that you have and lay them out where they are easily accessible.


Get your glue gun plugged in and grab your first ball. Pull the metal portion away from the top of the ball.


Once the glue gun is hot enough place a dab of glue on the top of the ball, where the metal will overlap on the ball. Quickly push the metal down and twist it gently so the glue will be covering a fair area of overlap. If you're like me, you may have to push the metal tabs down so they are tighter with the glue.


Once you have all of the balls done take an old wire coat hanger that you don't need anymore, and bend it into the best circle that you can get it. Untwist the two ends of the hanger so you are able to start sliding the balls on to the hanger. They should end up looking something like this...


It's not a perfect circle, but once it's done it really doesn't matter if it's perfect or not, as long as you are happy with it. Once you've got it looking the way that you like, twist the two ends of the wire back together (you may need a pair of pliers for this).

Next you will take remaining balls and get them placed on top so they start filling in the obvious wire showing and holes that are visible. These wont be attached to the hanger, so you still need the glue gun. Take a ball and make a glue ring around it close to the top.


Quickly place it so its filling a hole and make sure you press the balls that are underneath it up to it so it all sticks together and makes a solid wreath! Once you get it all around it should look a lot more full, not perfect, but better.


After this I went around the wreath adding in a dab of glue between each of the balls, securing them all together. Once all the glue is dried (leave it for about 4 minutes just to be certain), lift it by the hanger. If you hear any of the glue come unstuck you need to add in an extra dab.


I took some translucent red ribbon, weaving it through some of the holes.


After I got all the ribbon through I began to figure out how I was going to place the little blue Christmas balls. I used the same technique on them as I did the middle red ones (the ring of glue around the ball), placing them accordingly.


Some of the glue looks a little obvious in the pictures, but once it's up on the door no one will notice it!

With the ribbon ends, I tied them in a knot at the top, where the hanger was twisted back together. There are 2 pieces that are covering up the wire that was twisted together (just in case there are marks if you used the pliers).

And here's my final product.


I hope you have fun with yours and especially have fun with the colours you choose! They are amazing looking :) I'm so happy with mine, even though I was unsure about it the entire time I was making it...especially using glue! I guess I'll see how well that holds up though. If you end up making one comment with a picture of it, I'd love to see if this works for everyone else!

Tuesday, 7 January 2014

Better late than Never!

During the 12 Days of Christmas I did, I posted Ginger Molasses Cream Cheese cookies. Well I had actually made a double batch of the cookie dough, so I decided to make Reindeer cookies. You've all seen them, don't deny it! And they're super cute too!

Here's how I did the decorating on mine.


Monday, 6 January 2014

Ham and Cheese Sliders

Mmmm...more leftover Ham! haha I will be happy once it's all gone! There will be a big sigh of relief once it is!

Last night for dinner, instead of having Ham, Potatoes and a Veggie...we decided to mix it up a little bit. We had a bunch of buns left over from the other day as well. Instead of them going bad...lets do sliders!

I've never made sliders before, so I wasn't really too sure on how long to bake them, or how much should go in them. So this was a bit of an experiment for me too.

Pre-heat oven to 425.

So first I cut the buns in half, placing the bottom half in the glass dish (sprayed with Pam to help it not stick) and the other half on the counter. I made sure I put them in the same order on the counter as I did in the dish so the tops and bottoms went together properly.


I then took out the Ham and cut thick slices and quartered them. I placed 2 on each bottom bun in the dish.

Next I shredded the cheese and added a thick layer all over. I love cheese, so I tend to add a lot! This is all I added into them, you can add more, but I tend to like plain-and-simple.


Place the tops of the buns (buttered) over the cheese.


Add 1/4 cup of Vegetable Oil to a small bowl. Add in Italian Herbs, Rosemary, Oregano and Basil (I like a little extra flavour, so you can just stick with Italian if you please). Mix together. Brush all of the mixture over the top buns.


For a little extra jump I added a dash of Parmesan cheese and Garlic Powder to the tops as well.


Place in the oven for 15-20 minutes or until the cheese is melted!

This was a hit! Everyone had 2, except me because I was too full from the first!

I wasn't too sure about it because the top buns went rather hard, but they were still fantastic. So maybe a tip would be to leave the tops of the buns off until the last 5 minutes.

Sunday, 5 January 2014

Mini Quiches! - No Crusts!

You might be like me and not really care for that thick, powdery crusts of the Quiches that you can buy in a store. So why not have it without?!

We had some family friends over for New Years Day and we decided it was a good time to use up one of the 2 8lb Hams that we had won at the local Lions Ham and Turkey Bingo. I don't know if you've ever seen or carried an 8lb Ham...but they are big. So with 7 of us eating the Ham there was still a ton left over...it's been a week full of Ham. I figured it was time to mix it up a little bit.

My mom has made Mini Quiche before, but we've always had a problem pulling them off the paper baking cups (muffin cups). I figured I would give it a shot anyways. I did one tray with baking cups and one tray without, just made sure I Pam-ed the trays and it worked much better.

So first I started off cutting up the left-over ham, and shredding the cheese. I used mozzarella and marble cheese mixed together. I put Ham in one bowl and the cheese in another.


Then I got out a dozen Eggs and cracked them in a medium-sized bowl, whisking them together. Add in a bit of milk, salt and pepper (like making scrabbled eggs).


Heat oven to 375 (I was experimenting with temperature, but this seemed to work best for my oven).

Grab your muffin tray and spray with Pam. Pour, or spoon in eggs about half full. (I did it so there was only 1/2 an egg per quiche that way I was able to get 24 mini quiche instead of just 12)


Next add in a bit of ham. I cubed my ham, so I added in a bit more, but it's all to taste.


Then top off with a bit of cheese.


Pop it in the oven for 15 minutes.

Let cool, once finished, for 5 minutes. Then move to a cooling rack if you are making them ahead of time. If you are planning on eating them right away, don't worry about cooling. Just be very careful handling them and getting them out of the pan.


Saturday, 4 January 2014

Dad's Birthday Cake

Again this is just me showing off!

This isn't a recent cake as my Dad's Birthday is in November. This was me experimenting and just seeing what I could come up with on my own. I was feeling rather confident when I made this cake because I had decorated a cake a few days before for a customer at work when the cake decorator wasn't there. The customer was so happy with the way I had decorated her cake that she came in 3..THREE times to tell me what a wonderful job I had done on her cake. Really I had only added on some fruit and decorated a sugar plate with a Happy Birthday on it.

Anyways, here is the cake I made. It's a double layer, simple white cake, just decorated in icing, strawberries and Lindor Chocolates


Friday, 3 January 2014

Cake Decorating!

So I just got wind last night that my next Wilton course has been cancelled for the month because I was the only one registered! What?!?! Seriously, so disappointed about that one. I was so looking forward to doing this class because it's Course 4, meaning last course and I would have been "Wilton Certified". Now I have to wait another month before classes start.

I got looking through my pictures and realized I hadn't posted any of the pictures I took of my final cake for Course 3/my little sister's Birthday cake...which lucky for me was the exact same day. So I used the cake I made for class to my advantage and turned it into her cake. I let her choose the colours for the fondant on the cake, I just had fun with the flowers. There are Calla lilies, Daisies, Mums (Chrysanthemums), and Roses on the cake. I also got told, if I could...add John Deere colours. Well, hell...I'm not gonna argue with good ol' John Deere colours!

So low-n-be-hold here is the cake I made.


Although you cannot see it in the pictures I also added flowers on the sides in icing, but I do regret adding them in because it made it too crowded in the front. Next time I will know what not to do!